Logging In
The login page for any Arts & Sciences website follows this pattern: https://(yoursite).wustl.edu/user. If you go to your website and just add "/user" to the end of the address, you will then be taken to a log-in screen where you can click the red button to log in with your WashU Key.
Your Administrative Toolbar and Shortcut bar
After logging in, the administrative and shortcut toolbars will be visible at the very top of your page. The administrative toolbar will be blue and the shortcut bar will be white. Depending on your user role, the options in the bars might be slightly different. If you do not see the lower shortcut bar when you sign in, click the 'Manage' button in the top row.

Content Overview:
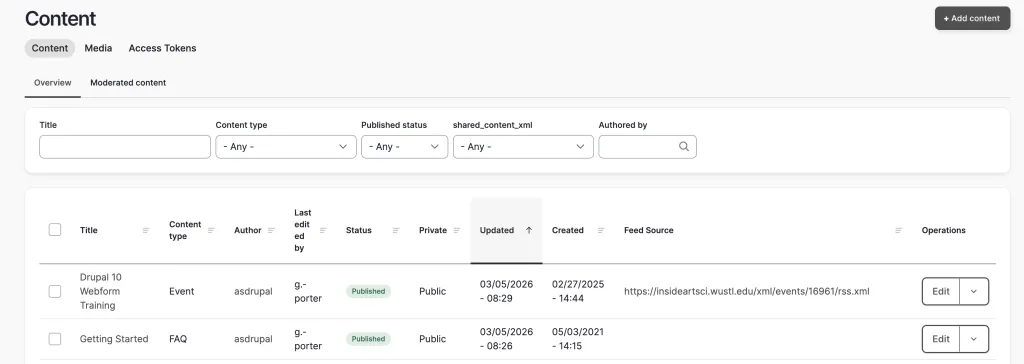
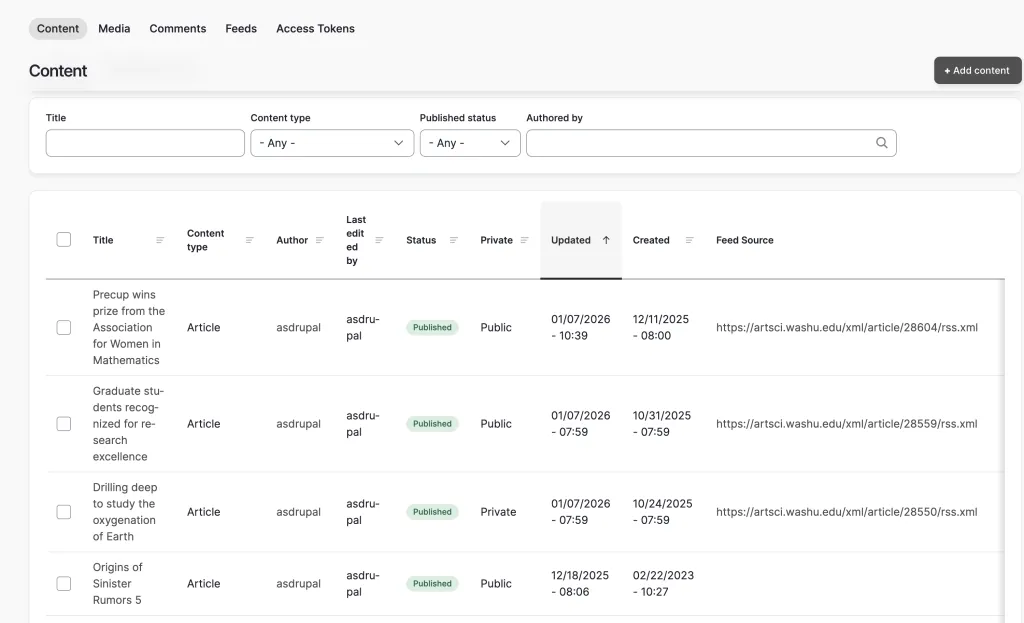
Clicking on Find Content in the admin toolbar takes you to the content overview page.
You will see a list of all of the published and unpublished content in your website, ordered by the most recently updated. You can use fields at the top to filter for a word in the title, by content type, author, or by moderation state.
Clicking a column header will reorder the contents by that column.
- Title: The title of the page
- Content Type: The content type (Basic Page, Event, Article, etc)
- Authored by: The account used to create the content
- Last edited by: The name of the person who last edited this piece of content
- Status: Displays published, unpublished, draft, and review
- Private: Indicates if a piece of content is private or public
- Updated: Date and time of the last update
- Created: This shows the original date the page was created
- Feed Source: displays a URL when that content has been imported from another website
- Operations: A quick way for you to edit, delete, or clone a piece of content. Depending on your level of access, you may not have the ability to use all of these options.
Moderated Content Overview:
To see your moderated content, click on Find Content in the admin toolbar and then choose the Moderated Content tab. This will display a list of all of the content in your site that isn't visible to the public: Unpublished, Draft, and Needs Review
Unpublished: When content is saved as 'unpublished', it will not display on the live website but can still be found on the content moderation page. The Unpublished status can be used to archive content you may want to use at a later date.
Draft: When content is saved as 'draft', it will not display on the live website. The draft status is useful for saving work in progress.
Needs Review: When content is saved as 'needs review', someone with the Site Manager role must approve and publish it to the live site. This status is only for use by the Editor user role.
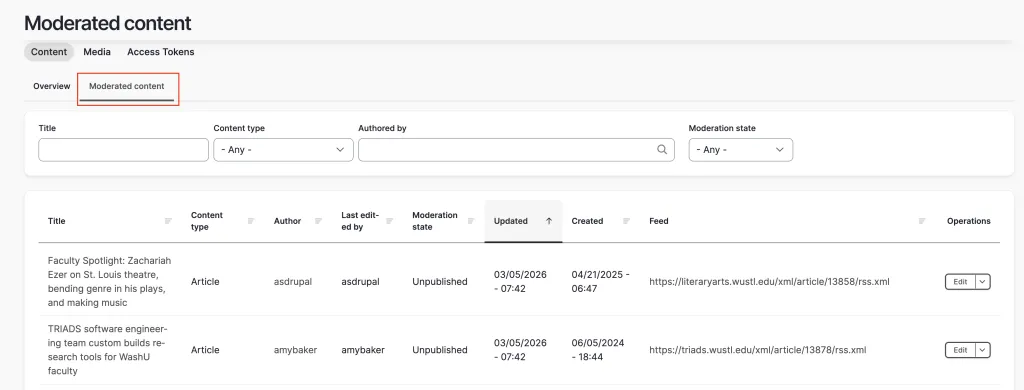
Note: If you have a piece of content that is saved as 'needs review' or 'draft', you will not see the 'published' option. The content must first be saved as 'unpublished'. After the content has been saved as 'unpublished', you will then be able to publish your content.
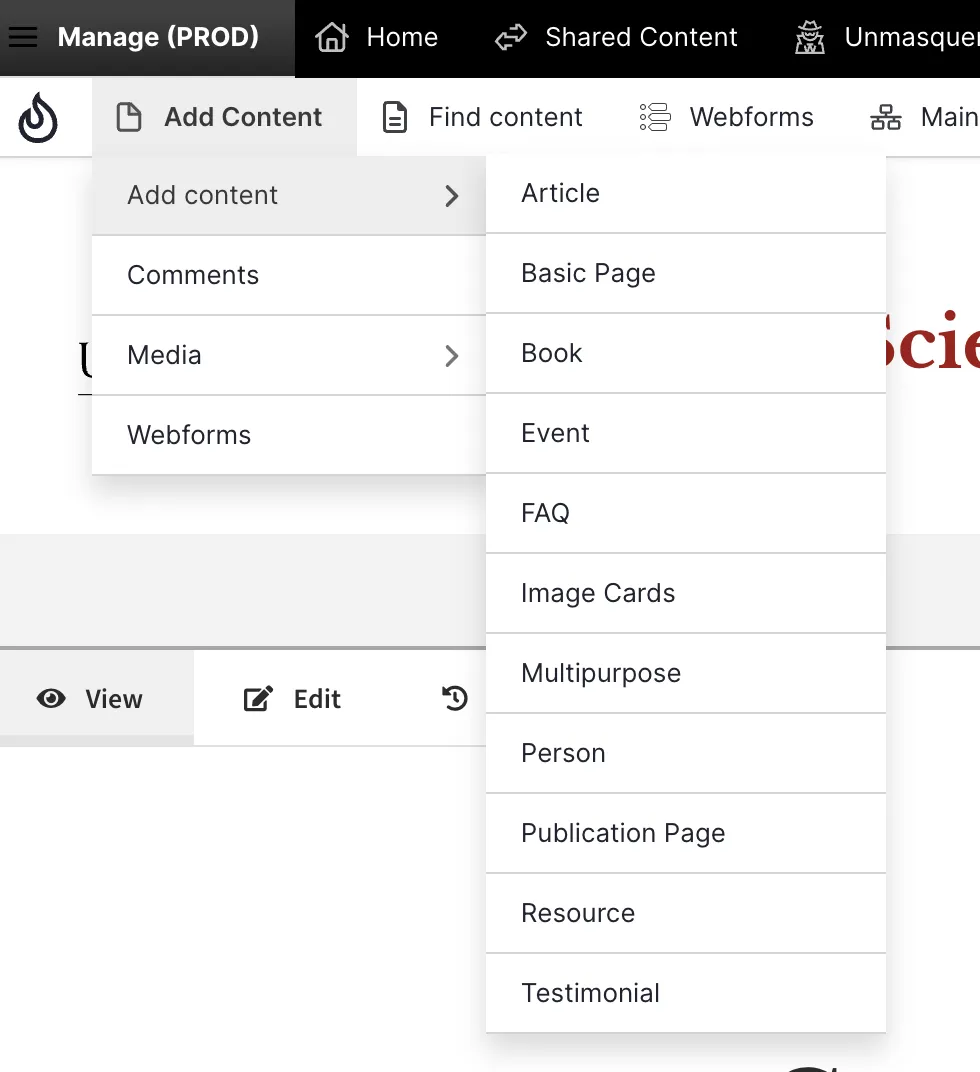
Clicking on Add Content will allow you to add new content to your website. What types of content that you can add will depend on your permission level.
Clicking on Webforms in the admin toolbar will take you directly to the Webform overview page. This page will let you view and manage your forms, see web form submissions, and even add a new form. For more information about webforms, please see our webform documentation.
Shared Content is the ability to share certain content types (article, event, person, and book) between Arts & Sciences departments and centers. Clicking on Content Sharing in the toolbar will take you to a list of all of the shared content that is available for you to import. For more information about how to use shared content, please see our shared content documentation.
If you aren’t seeing changes or updates you've made to your website (especially on landing pages), these and many other issues can be fixed by clearing your website or browser cache. To clear cache in your website, simply click the ‘rebuild cache’ link in your admin toolbar. To clear your browser cache, choose your OS and browser and follow the step-by-step directions.
If you have any questions while you are editing, clicking on this link will take you to the Arts & Sciences webguide.
Menus and Quicklinks Management

Main Menu
The main menu is the square menu button that is located at the top of each page and travels down the page while you scroll. The main menu should display links to your most important content.

Secondary Menu
The gold (secondary) menu is visible when you open the main menu. Ideally, it should contain links to secondary landing pages such as news, events, courses, and contact us.
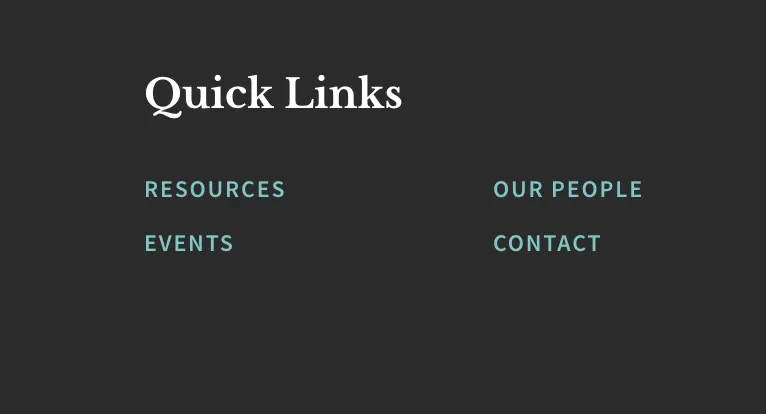
Quick Links
The quick links are available in the site footer area that displays on all pages in your site. This section should have no more than eight items.
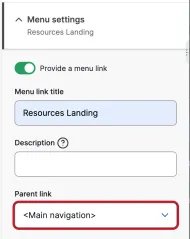
To add a link to the main menu, gold menu, or quick links, edit the page and turn on the "Provide a menu link" toggle under the menu settings tab at the right of the page. This will expose additional options related to menu settings. You can select a parent item to designate in which menu this link should display.
Some content types that should not be added to a menu, such as events, do not have this option.

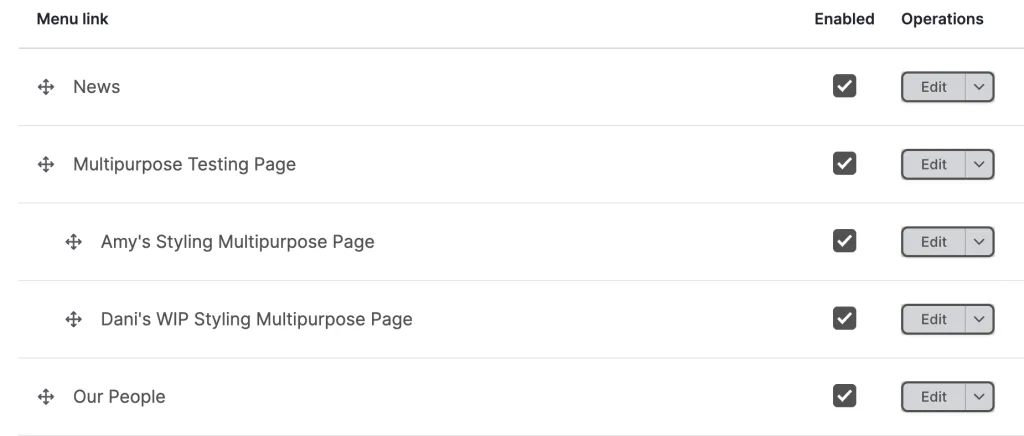
- Click on one of the three menu types in the shortcut bar.
- Once on the menu administration screen, click and drag the cross-hair icons to rearrange menu items.
- Once you've finished rearranging the menu, make sure to click the save button at the bottom.
Creating New Content
Updating and adding new content to your website is an ongoing project. The content strategy team will provide you with checklists to help you with planning throughout the year.
What content you can add is based on your user role. If you have questions about what you have access to, please consult our User Role Guide. If you have site manager access, these are the content types you can add to your site:
- Articles
- Basic page
- Books
- Events
- FAQ pages
- Image cards
- Multipurpose pages
- Person
- Resource
- Testimonial
- Webform
- Publication page
Content types you can edit but not add:
- Home page
- Events landing page
- Past events landing page
- News landing page
- Image card landing page
- People landing page
- Resource card landing page
Please note that you can only have one of each type of landing page. For example, you can't add multiple Events, People, or Image Card landing pages.
No! You will be able to edit/add/access certain content types based on your user role. If you have questions about what you have access to, please consult our User Role Guide.
There are several things that only the webteam will have access to edit. Some of these include:
- Adding and editing taxonomy/filter terms
- Switching between the card and list layout options for certain landing pages
- The Additional Information links in the footer
- The social media icons in the footer
- The site name and email address in the footer
- Adding an Instagram account to the Instagram block on the home page.
If you need to have any of these things edited, please contact the webteam.
After logging into Drupal, click on the Add Content link within the admin bar at the top of the page. After clicking it, you will see a list of the content types that you have permission to create. Click the type of content you want to create (e.g. event). Complete all form fields. Required fields are marked by an asterisk. When you have finished adding content, click the Save button at the bottom of the page.
Another way to create new content is by cloning existing content. There are a few reasons why you may want to clone content. One would be if you had a recurring monthly event. You could make one event, clone it, and then adjust the title and date on the clone. Another would be if you would like to try out a new layout for some content. You could clone an existing multipurpose page and then make edits to see what adding or deleting sections would look like before you did it on your production site.
To make a clone, go to the piece of content and click on the 'clone' tab. If you do not see the clone option, that means this content type cannot be cloned.

Once you have done this, you will get a 'new label' field that will allow you to change the title of the new cloned piece of content. Next, click the 'clone' button. You should now see the cloned page.
What are taxonomy terms?
Taxonomy terms are used to categorize and sort certain types of content and are a very important part of your website. Each website in our A&S web theme has its own set of taxonomy terms. They can be found in Articles, Events, People, Resource Cards, Image Cards, and Books.
Where can I find my website's taxonomy terms?
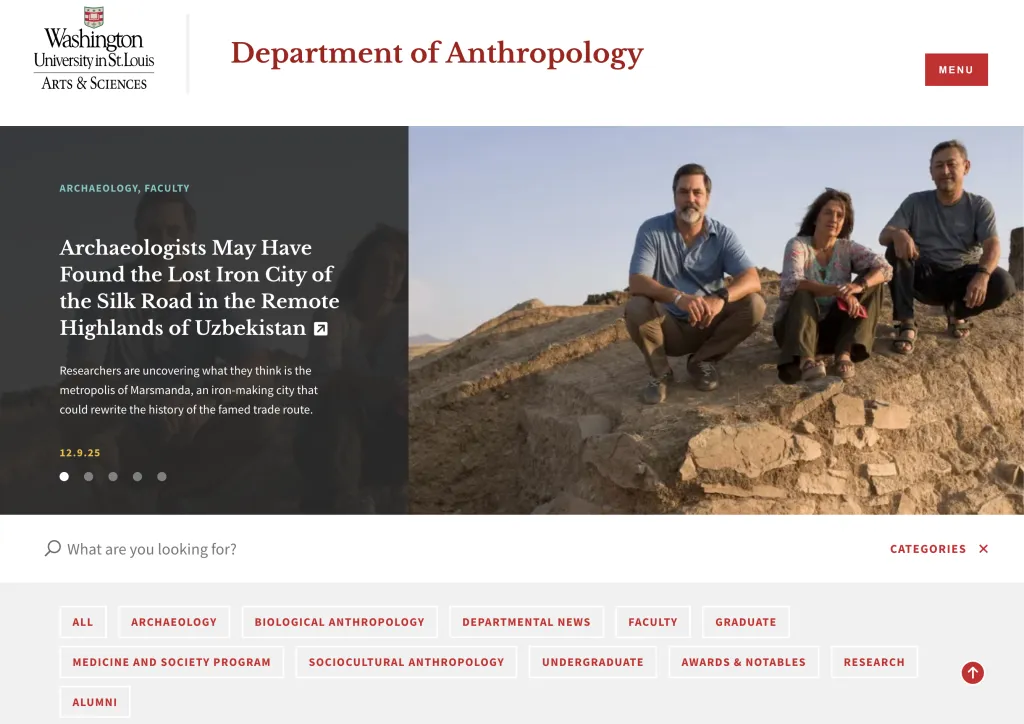
If a visitor goes to a landing page in your website and clicks on the 'categories v' in your search bar, it will open up a list of the taxonomy terms being used for that content type. If someone clicks on one of these terms, it will display all of the articles that are tagged with that term. This means that a user looking for articles about faculty in the Anthropology department would click on 'faculty', which will display a list of all of the articles on the Anthropology website that have been tagged with the term 'faculty'.
Taxonomy term filter
The taxonomy term filter bar can be found on:
- Resources Landing Page
- News Landing Page
- Event Landing Page
- Past Event Landing Page
- Image Card Landing Page
The taxonomy bar filter has three different ways to be displayed:
- Always open: The taxonomy term filter will be open so the terms are always visible
- Collapsed: The taxonomy terms will be hidden until the user clicks on the 'V' to make them visible
- Hidden: There will be no taxonomy terms visible to the site visitor
The 'all' taxonomy term will always display in the list of categories and cannot be removed. Any changes that need to be made to the article taxonomy/filter terms or how they display can be sent to the web team at artsci-webteam@wustl.edu
Custom taxonomy term filter
The People Landing Page has its own unique filtering system. For more information, see the People documentation
How do I tag a piece of content?
When you are editing or creating a piece of content, you will see a 'Category' section with a list of the taxonomy terms available on your site for that particular content type. In the example below, this is the list of taxonomy terms available for articles on the Anthropology website. You can see that they match the taxonomy terms that are displayed to users :
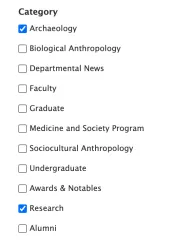
You can tag a piece of content with multiple taxonomy terms. If you do not tag a piece of content, it will still display on the landing page, but will not display if a user clicks on taxonomy terms since it hasn't been tagged with anything.
If you would like to have a taxonomy term edited, added, or deleted, please contact the web team at artsci-webteam@wustl.edu.
Creating Private Content
Your website has an option to make pieces of content private. Users must have a 'viewer' role in your website to view private content. If you have questions or are interested in learning more about private content, please contact the webteam at artsci-webteam@wustl.edu.
Content types that can be set to private:
- articles
- basic pages
- books
- events
- FAQ pages
- image cards
- multipurpose pages
- person
- publication page
- resource cards
Please keep in mind that the Home page, News Landing, Events Landing, People Landing, Image Card Landing, and Resource Landing pages are all one-time-use pages. This means that you cannot have multiple versions of any of these landing pages. For example, you can not have a publicly facing Event Landing page and a second private Event Landing page that only certain people can see.
Since you cannot have both a public and private Home page, we recommend using a Multipurpose Page for your private Home page.
Here is an example of that: https://it.artscistage.wustl.edu/intranet-landing-page
When you are signed in and go to Find Content in the admin menu, it will display a list of all of the content in your site. There is a column titled 'Private' that will indicate if a piece of content is private or public. If you click on the column title, it will allow you to sort the content by public or private.
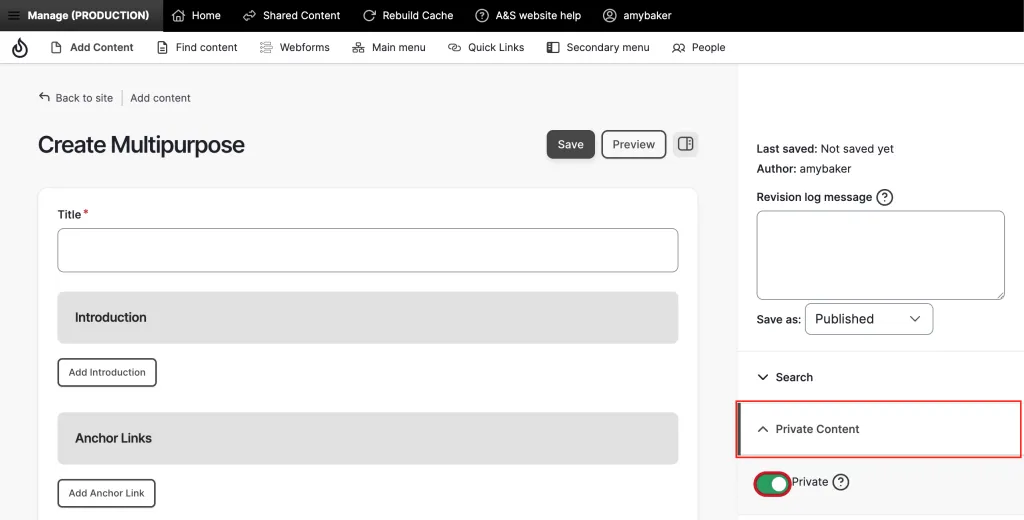
After creating a piece of content, you can set it to be private. Users with the Site Manager and Editor roles both have access to make a piece of content private:
- Edit the content
- In the right-hand column, click on “Private Content” to expand it
- Toggle on the Private setting
- Save
Viewer
In order to view your private content, a person will need to be added to your site and assigned the 'viewer' role. This will allow them to view the private content, but not edit it.
Account Manager
An Account Manager adds all new Viewer accounts to the website and can view a list of all users. They can also remove users by blocking their accounts.
Creating and removing viewers will need to be managed by the Account Manager. There is not a method for allowing “anyone with a WashU Key” like we have in Box.
To create viewers, a person with the Site Manager role must also have the Account Manager role added to their account.
With Account Manager and Site Manager roles, your admin toolbars will look like this:

There are two different options for adding viewers:
Have user accounts created automatically on first login
- Share the login URL with people and ask them to log in once.
- After they have logged in, go to the admin toolbar and choose the "People" option. This will open up a list of all of the users in your website.
- Edit each person's account to assign them the "viewer" role by checking the box in front of "Viewer" below the heading "Roles."

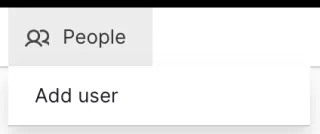
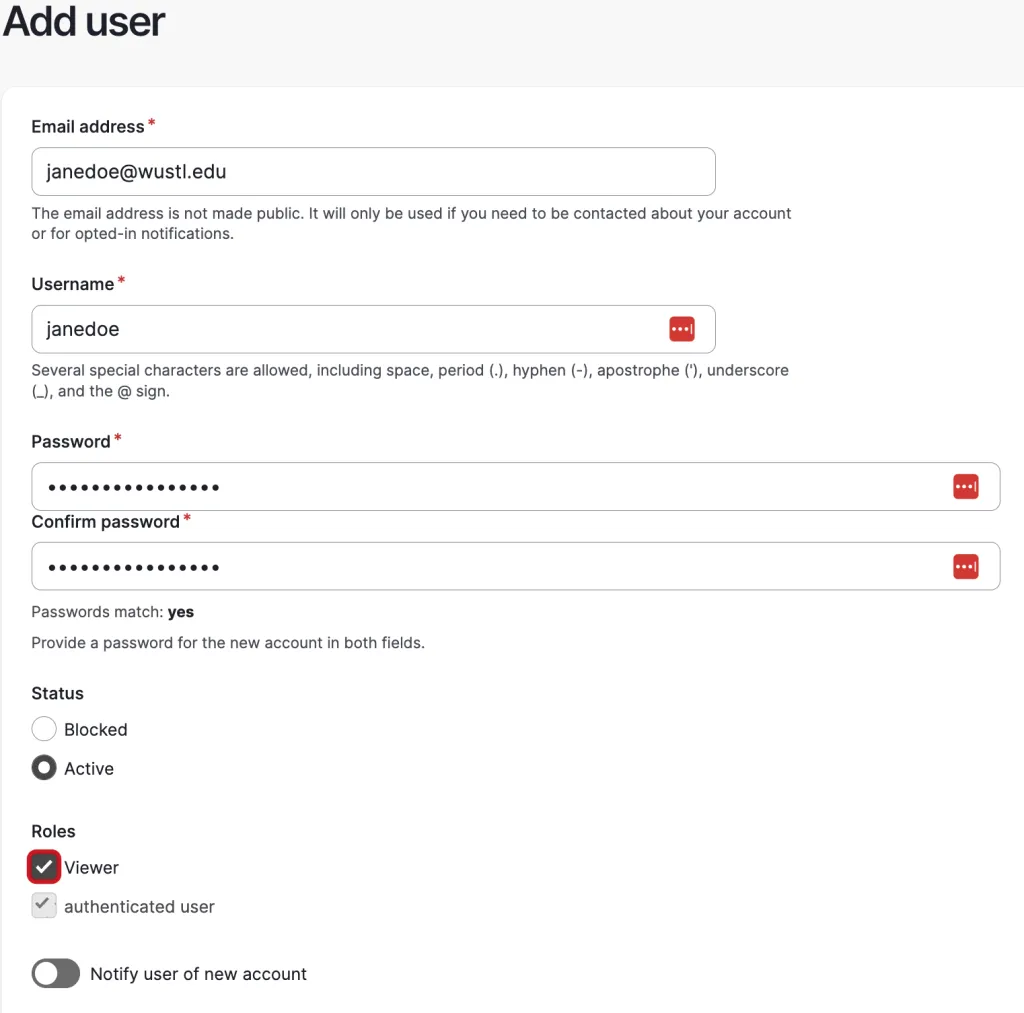
Create user accounts manually:
Go to the admin toolbar and hover over the "People" option. Select "Add User"
- Add the person’s @wustl mail address and WashU Key username
- Create a password. The user will not need to know this password because they will be prompted to sign in with their WashU Key.
- Make sure status is “Active”
- For role, select “Viewer”
- Save
Please note that the 'notify user of new account' option does not work as of 3/5/25.
Creating and removing viewers will need to be managed by the Account Manager.
Please audit your viewer accounts every six months to ensure you are not permitting viewers who have left the department or otherwise should no longer have access to see the private content.
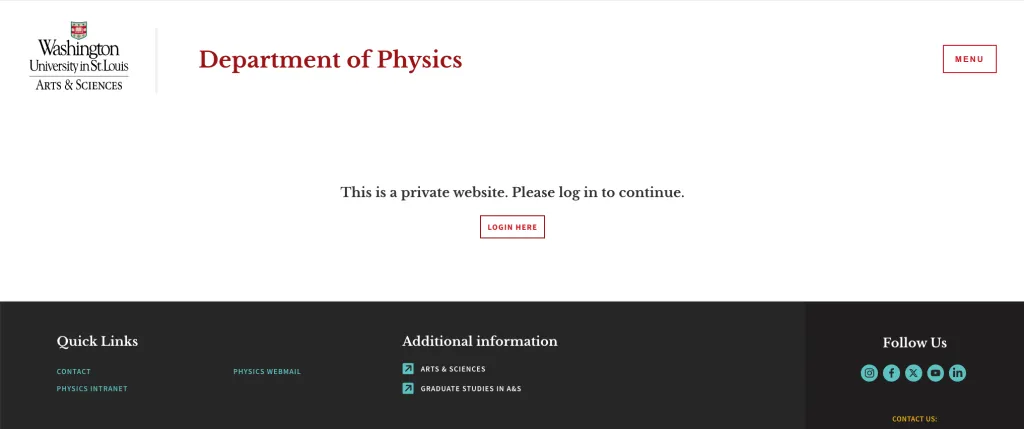
To remove a viewers access, go to the People tab in your admin toolbar. Go to the profile of the person who you would like to remove and change the status to 'blocked'.
They will see a notice that reads "This is a private website. Please log in to continue." followed by a "Login Here" button.
Page Settings
When editing a piece of content, there is a collection of page settings in tabs at the right of the editing screen. Most of these options are the same across all types of content.
Exceptions to this are the Shared content settings (only available on sharable content) or Menu settings (not available on some types of content that should not go into a menu, such as events).
Depending on your user role, you may only see some of these options.
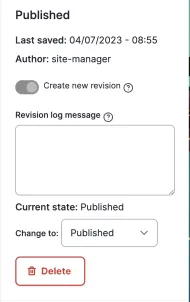
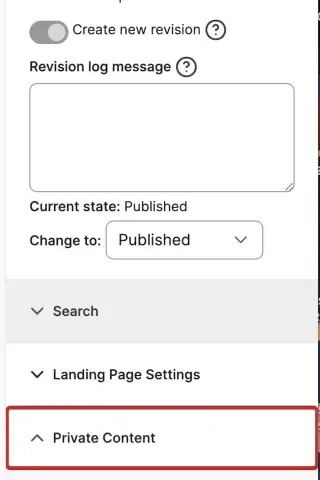
What is a revision?
When you are editing a page in your website, a new revision is automatically created each time you make and save a change. If you would like to save a log message with your revision, you can add it in the 'revision log message' field on the right of your editing screen before you save your content.
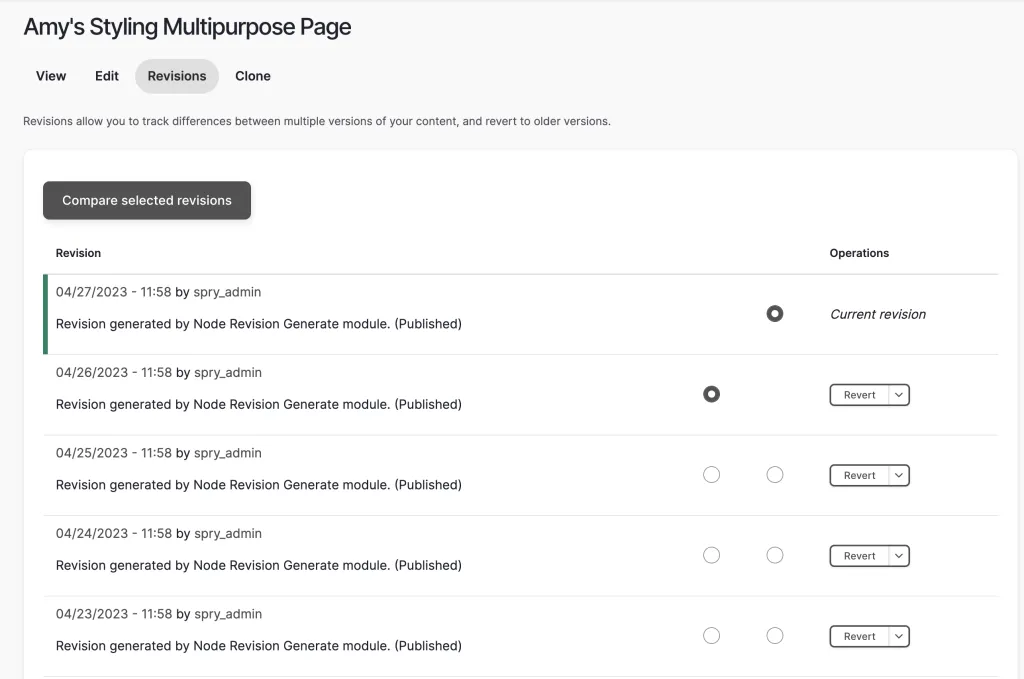
How to use and find a saved revision:
When you are editing you will notice a 'revisions' tab at the top of the page. Select that tab to see a list of all revisions and log messages for that page.

On the Revisions tab, you will see saved revisions listed with the date, time, username, and log messages in the left column and options to either revert or delete in the right column.
To preview a revision without actually reverting to it, click the date. After reviewing, use the browser's back button to return to the list.
Please keep in mind that there can only be 10 revisions saved for each page. If you have more than ten, the oldest one will drop off the list each time you save a new one.
The moderation state options let you know the current publishing state of your piece of content and allow you to change to a different one.

The options are:
Published: When content is saved as 'published', the content will be immediately visible on the live website.
Unpublished: When content is saved as 'unpublished', it will not display on the live website but can still be found on the content moderation page. The Unpublished status can be used to archive content you may want to use at a later date.
Draft: When content is saved as 'draft', it will not display on the live website. The Draft status is useful for saving work in progress.
Needs Review: When content is saved as 'needs review', someone with the Site Manager role must approve and publish it to the live site. This status is only for use by the Editor user role.
Note: If you have a piece of content that is saved as 'needs review' or 'draft', you will not see the 'published' option. The content must first be saved as 'unpublished'. After the content has been saved as 'unpublished', you will then be able to publish your content.
To make a page in your site private, go to the individual page settings and choose the 'private content' tab. When you change the page setting to 'private', only users with proper access permissions will be able to see this content.
To add a link to the main menu, gold menu, or quick links, edit the page and turn on the "Provide a menu link" toggle under the menu settings tab at the right of the page. This will expose additional options related to menu settings. You can select a parent item to designate in which menu this link should display.
Some content types that should not be added to a menu, such as events, do not have this option.

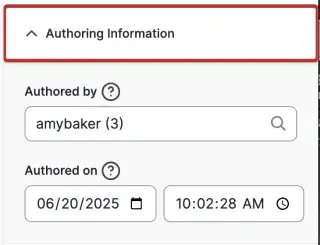
This tab allows you to edit the author or 'authored on' date of a page. Please note that the 'authored on' date on individual articles is what determines the order in which the articles will display on the article landing page.
What are meta tags?
Meta Tag options are available in a tab at the right side of every page when you are logged in and editing.
BASIC TAGS
- Title and Description will be filled in automatically. The other options in this section are not necessary.
ADVANCED TAGS
- Some of these will be filled in automatically. For most sites, this is all that is needed.
OPEN GRAPH
- These control how Facebook, Pinterest, LinkedIn, etc interpret the site's content. We recommend customizing the content description field in this section for articles that you want to promote. This will optimize sharing on social media.
- This is specifically for API use - which most of our sites don't need.
TWITTER CARDS
- Choose the Twitter card type option that best describes the way you want the content of the page to be displayed when shared on Twitter.
- Most of the important fields in this section will be filled in automatically, but you may need to fill in your Twitter account if it did not exist at the time the site was created.
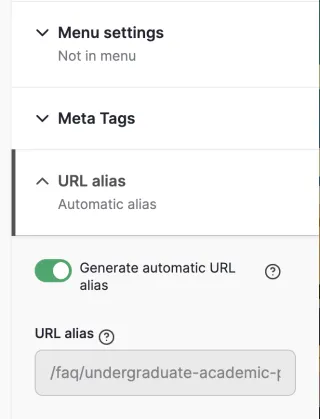
The first time content is saved, Drupal automatically generates a nice URL alias based on the title.
If you would like to make a custom URL, turn off the 'generate automatic URL alias' toggle and enter a new URL. Please note that you should only add the last part of the new URL. So if you want https://website.wustl.edu/international-cost-estimates as a custom URL, then only enter “international-cost-estimates” in that field. The old url will redirect to the new one automatically. There is nothing you need to do to make that happen.
If you are creating content and would like someone who does not have access to log into a website to see your work before you publish it, there are two ways you can share non-published content.
Hashed Link
One option is giving them a 'hashed' link. After saving your page in one of the non-published states, you will see two banners on the front of your page:

If you click on the underlined 'hashed link' text, you will see that the url changes to a link with the word 'hash' followed by a long string of letters and numbers. This is the link you need to give them in order for them to see the non-published content.
Temporary Unpublished Access
You can also give them a token to view the non-published content. When you are editing your page, you will see a 'Temporary Unpublished Access' tab.
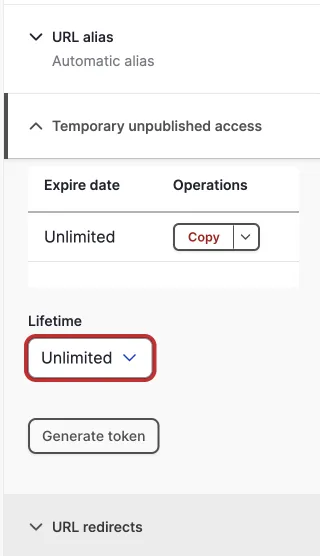
Choose the a time limit for how long they can access the content and then click the generate token button to create the link. You can now click 'copy' to paste and share the link.
Accessibility
Web accessibility ensures that online information is accessible to everyone and provides equal access to all users, including those with disabilities. This includes visual, auditory, physical, speech, cognitive, and neurological disabilities. Making our web content accessible to people with disabilities also benefits others, including those with changing abilities because of aging or those in temporary situations that impede their ease of accessing web content. Providing accessible website design removes barriers to information essential to our faculty, staff, students, and the community.
To learn more about web accessibility, please visit our main accessibility website.
When you are creating content or editing your website, there are a number of things that content creators can do to ensure your sites provide equal access and equal opportunity to people with diverse abilities. How you add photos, links, and text can make a huge difference to the user experience of someone who has a disability or uses assistive technology.
Arts & Sciences offers a checklist to help you both create accessible content and ensure that your current content is accessible. This checklist isn't all-inclusive, but it is a starting point to help make your website more accessible.
Siteimprove is an automated tool used by Arts & Sciences that regularly crawls the department and center websites to monitor for several different types of problems and alerts site maintainers if any are found. It can provide information on issues that cause accessibility issues, such as broken links and misspellings. Automated tools like Siteimprove can be set up to quickly analyze the code of your pages for certain problems and then generate a report. While this is quicker than manually checking a page or entire site, it can't tell you if the font is legible, the alt text is accurate, or the headings make sense. Automatic tests save time and should be done regularly, but can't completely replace manual testing.
Where should I go for help?
The first thing you should do is check the website guide or one of our other online resources. The ArtSci Website Guide has extensive information, step-by-step instructions, and can usually answer most questions.
Some of our other guides:
Website Image Guide: Feeling overwhelmed by images? This is the guide for you! This is where you can learn about finding images, image editing, and much more. Do your images still not look quite right? Visit our image troubleshooting page for some suggestions.
Web Accessibility Guide: We all need to do our part to make sure online information is accessible to everyone and provides equal access to all users, including those with disabilities! Providing accessible website design removes barriers to information essential to our faculty, staff, students, and the community. This guide will show you some simple things you can do as a content editor to help with your website's accessibility.
Website Media Guide: Your website is a great way to use video, podcasts, and images to showcase your department! This guide will walk you through how to add media to your website.
A&S Social Media Guide: Before you create or manage a social media channel, please contact Gennie Avellino (avellino@wustl.edu) to learn about the A&S social media policies and help you with a social media strategy for your department or center.
Contact the Webteam
Still need help or have questions? Feel free to contact the A&S web team at artsci-webteam@wustl.edu. Because our entire team has access to this email account, this is the quickest way to receive help. We encourage you to contact us here instead of emailing an individual person on the web team!